Deploy RStudio and Shiny Server on Ubuntu
This guide will walk through the steps required for deploying an RStudio and Shiny Server on Ubuntu as well as setting up a custom domain, SSL certificates and user authentication for your server. I found there were a number of guides on this subject but none that fully worked for what I was trying to achieve. For this guide I will be using a Google Cloud virtual machine running Ubuntu 20.04 but the steps should be very similar for whatever platform you are using.
Create a Swap File (Optional)
It is important to note that if you are using a server with less than 3GB of ram then we need to create a swap file so Ubuntu can use available hard drive space when the system ram is full. Simply follow the guide here or follow the steps below:
Navigate into the root directory by typing the following command:
cd /
Create the file to be used as a swap file, count=3000 represents 3GB:
sudo dd if=/dev/zero of=swapfile bs=1M count=3000
Convert the newly created file into an actual recognized swapfile:
sudo mkswap swapfile
Enable the swap file with the following command:
sudo swapon swapfile
Enable the swap file on system startup by opening the fstab file:
sudo nano etc/fstab
Add the following line into the fstab file below any existing lines and save the file:
/swapfile none swap sw 0 0
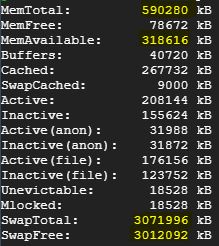
To confirm that the swap is working as expected type the following command:
cat /proc/meminfo
We should be able to see that the system memory available shows around 3GB
Configure Firewall (Google Cloud Platform Only)
Since RStudio server uses port 8787 and Shiny server uses ports 3838 we need to make sure these are open, similar firewall adjustments may be required for your specific setup. In the Google Cloud Platform firewall enter the following commands for RStudio and Shiny respectively:
sudo gcloud compute firewall-rules create rstudio-conn --allow=tcp:8787

sudo gcloud compute firewall-rules create shiny-conn --allow=tcp:3838
Install Ubuntu Updates
The next step is to make sure Ubuntu is fully up to date:
sudo apt-get update

sudo apt-get upgrade
Install nginx (Optional)
Next to add authentication to our RStudio and Shiny servers we will need to run a proxy server, to accomplish this we will use NGINX, if you don’t need Shiny Server user authentication then you can skip this step. Use the following command to install:
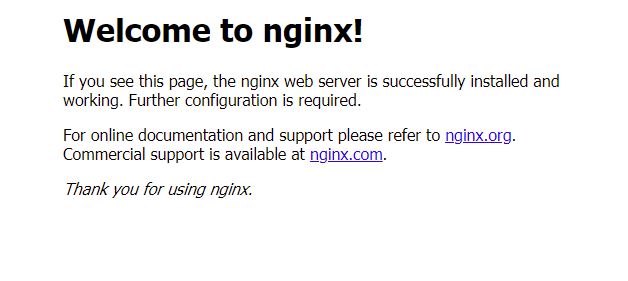
sudo apt-get install nginx
To verify that the installation was successful you can navigate to the static external IP address of your server in the web browser and you should see a welcome page.
Install R
Next we will want to install R with the following command:
sudo apt-get install r-base
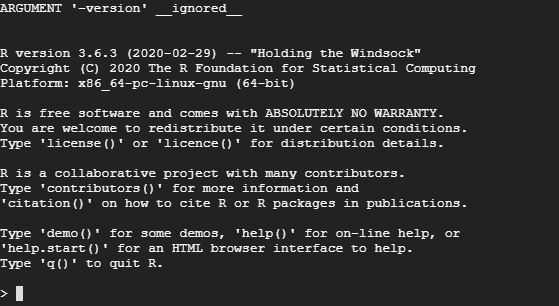
To verify that the installation was successful we can enter the following:
R –version
Change R Package Directory
It is important that we change the default R package library directory from a user based file path to a system based file path directory. If this change isn’t made each user will have to individually install each R package for applications to function properly. Use the following command to open the Renviron file:
sudo nano /usr/lib/R/etc/Renviron
Scroll down until you see the following two lines, comment out the top line by adding a # and delete the # on the second line:
#R_LIBS_USER=${R_LIBS_USER-‘~/R/x86_64-pc-linux-gnu-library/3.0’}

R_LIBS_USER=${R_LIBS_USER-‘~/Library/R/3.0/library’}
We can Run R again with the following command:
sudo -i R
To check R Library paths type:
.libPaths()
You should see the following library paths:

Install R Packages
Next we need to install some additional packages required for RStudio and Shiny to function properly on Ubuntu:
sudo apt-get install libgeos-dev libproj-dev libgdal-dev libcurl4-gnutls-dev libxml2-dev libssl-dev libcurl4-openssl-dev
Enter back into the R terminal by typing sudo -i R then install the following packages, note this may take some time:
install.packages(c('shiny', 'rmarkdown', 'dplyr', ‘devtools’))
Install RStudio Server
To install RStudio Server for Debian 10 / Ubuntu 18 / Ubuntu 20 enter the following:
sudo apt-get install gdebi-core

wget https://download2.rstudio.org/server/bionic/amd64/rstudio-server-1.4.1106-amd64.deb

sudo gdebi rstudio-server-1.4.1106-amd64.deb
If you are running a different version of Ubuntu additional details can be found here
In your browser navigate to http://your_static_external_ip:8787 to see if the installation was successful.
Create an RStudio User
To create an RStudio user use the following command, it will prompt you to setup a password so you can login:
sudo adduser enter_your_user_name
Install Shiny Server
To install Shiny Server for Ubuntu 16.04 or later enter the following:
wget https://download3.rstudio.org/ubuntu-14.04/x86_64/shiny-server-1.5.16.958-amd64.deb

sudo gdebi shiny-server-1.5.16.958-amd64.deb
If you are running a different version of Ubuntu additional details can be found here.
In your browser navigate to http://your_static_external_ip:3838 to see if the installation was successful.

We not have a fully functioning RStudio and Shiny server that can be used by multiple users to develop and deploy your applications. In Future articels I will explor adding a custom domain to your RStudio and Shiny Server, setup a SSL certificate and add user authentication to R Shiny server.