Secure Linux Servers
I have featured a number of articles that utilize Linux servers to host wordpress websites and setup R data analytics servers. As a result it is important that users review and implement some best practices to secure their Linux servers. The following isn’t an end all be all of ways to secure a Linux server but implementing the the best practices highlighted below will significantly improve the security of your servers.
1. Enable Automatic Updates
First check for any current updates:
sudo apt update


sudo apt upgrade
Next we will enable unattended automatic updates use the following commands:
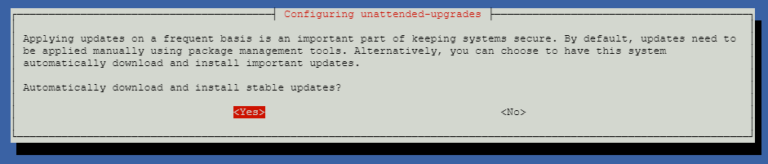
sudo apt install unattended-upgrades


sudo dpkg-reconfigure --priority=low unattended-upgrades
The following window will pop-up simply click Yes to enable the system to automatically download and install important updates.
2. Setup a non-root user account
It is important to not login to your remote server as a root user which has unlimited permissions. To create a new user account and add that account to the Sudo group, use the following commands:
adduser new_username sudo
3. Setup an SSH authentication Key Pair
Setting up an authentication key pair uses digital signatures rather than passwords to authenticate users which is substantially more secure. The first set is to determine if you have any existing keys setup on your local client computer (The computer used to access your linux server).
Navigate to the following folders depending on your operating system, if the folder is empty or doesn’t exist then you are all good to generate a new key pair. If one already exists then you can skip to the step where we upload the public key to the Linux server.
Windows:
C:\Users\username\.ssh
Mac OS X:
Users/username/.ssh
Ubuntu:
/home/username/.ssh/id_rsa:
ls -l ~/.ssh/id_*.pub
If no existing keys exist on your client computer enter the following command:
ssh-keygen -t rsa -b 4096
You will be prompted to choose where to save the key pair, the default location usually works best. You will also be prompted to enter a passphrase for extra security, it is option to leave this blank if you want to enjoy password free authentication.
Now we need to transfer our .pub key that was generated to our Linux server, use the following commands depending on your operating system:
Windows:
scp ~/.ssh/id_rsa.pub remote_userame@remote_serveripaddress:~/.ssh/authorized_keys
Mac OS X:
scp ~/.ssh/id_rsa.pub remote_username@remote_serveripaddress:~/.ssh/authorized_keys
Linux:
ssh-copy-id remote_username@remote_serveripaddress
Note: you may need to install the ssh-copy-id tool, use sudo apt-get install ssh-copy-id
4. Disable ssh password logins
Now that we have an ssh key pair, to increase security we can disable traditional password logins. In your Linux server enter the following:
sudo nano /etc/ssh/sshd_config
Scroll down to the section labelled # To disable tunneled clear text passwords, change to no here! and modify as follows:

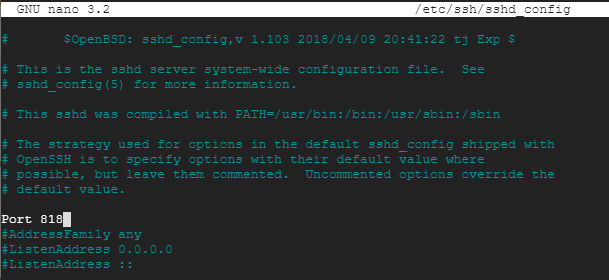
5. Change the default SSH port
Everyone knows that the default ssh port is 22, this is a problem because potential intruders can try connect to your server via SSH on port 22. Best practice is to change the default port to a random number, to do this edit the sshd_config file:
sudo nano /etc/ssh/sshd_config
Uncomment the Port line at the top and change it to something relatively high and random.
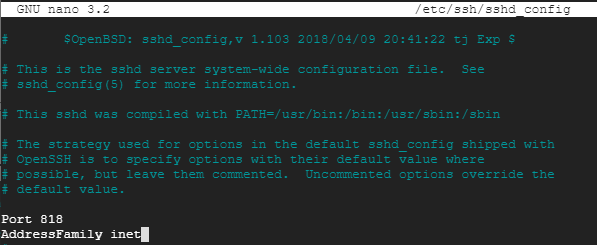
6. Set address family to IPV4
Most Linux servers don’t require ipb6 so we should disable it, in the same sshd_config file uncomment the AddressFamily line and set it to inet so the server only uses ipv4.
sudo nano /etc/ssh/sshd_config
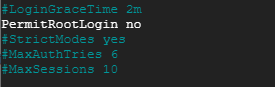
7. Disable SSH root login
To increase the security of our Linux server we want to ensure root users cant login via SSH, in the same sshd_config file scroll down and set PermitRootLogin to no.
sudo nano /etc/ssh/sshd_config
8. Install ufw firewall
Next we will want to install a firewall on our Linux server the easiest to manage is ufw.
sudo apt install ufw
Once installed we can check the status.
sudo ufw status
The next step is to check which services are listening to ports on your server.
sudo ss -tupln

For the services to run correctly we will need to add these ports to ufw before we enable the firewall. To do this we can use the following commands:
sudo ufw allow 323
We can also specify the Netid protocol:
sudo ufw allow 323/udp
or sudo ufw allow 323/tcp
IMportant Note!
If you are logged in via SSH it is important to add the SSH port you specified above before enabling the firewall. For example sudo ufw allow 818 otherwise you may not be able to access your server.
sudo ufw allow 818
Now we can enable the firewall:
sudo ufw enable
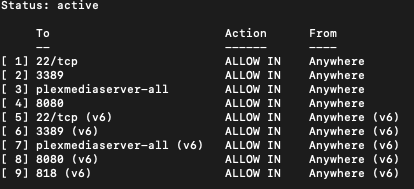
To view the firewall rules we can use:
sudo ufw status numbered
If you need to remove a rule, the command sudo ufw delete, for example:
sudo ufw delete 1
9. Disable ping response
Next we want to ensure our Linux server doesn’t respond to ping requests. Open the ufw before.rules file:
sudo nano /etc/ufw/before.rules
Scroll down to the section labelled ok icmp codes for INPUT and enter the following line:
-A ufw-before-input -p icmp --icmp-type echo-request -j DROP

Reload the firewall:
sudo ufw reload
10. Remove FTP and Telnet
It is important to not use less secure remote services such as ftp and telnet, the best way to mitigate this is to simply uninstall them with the following commands:
sudo apt-get --purge remove xinetd nis yp-tools tftpd atftpd tftpd-hpa telnetd rsh-server rsh-redone-server
To view a list of all installed packages and obtain additional information:
dpkg --list
dpkg --info packageName
To removed any additional unused packages use the following command:
apt-get remove packageName